Showing posts with label Android. Show all posts

Monday, February 15, 2016

NANDROID BACKUP for Redmi Note 3 [ROOTED] TWRP 3.0.0


Android phone has always been a geek’s joy, very convenient to customize with custom recoveries, custom ROMs and launchers. All seem too easy and fun, yet there are, times you might panic when you get a boot loop or asoft-brick while flashing or doing a simple update. There are many reasons behind it, eg. Checksum does not match, corrupted file or ROM, interruption of transmission between your device and the computer and etc. That’s where Nandroid comes into play, to restore your backup file as it was before, in working order. 

NANDROID BACKUP FEATURES:
Nandroid backup is the process of backing up your Redmi Note 3 like :-

  • Boot
  • Nvram – Stores WiFi, Bluetooth MAC address, Baseband version, IMEI/MEID number and other information.
  • System
  • User Data – Messages, Call logs, media and app data.


IMPORTANCES OF NANDROID BACKUP:

  • Revived your bricked device
  • Recover the important information stored in the NVRAM
  • Recover your personal data


REQUIREMENTS:

  • ROOTED – At least a Native ROOT
  • TWRP - Custom Recovery

LINKS TO FLASH TWRP:

TWRP Recovery for REDMI NOTE 3
ROOT, TWRP 3.0.0, SuperSU & GApps for Redmi Note 3 [UNLOCKED]
Flash TWRP.img on ROOTED Redmi Note 3 via Flashify on Mobile
SP Flash TWRP for Redmi Note 3

REBOOT TO RECOVERY MODE:

Go into Recovery mode, press & hold, the vol up + power button and release when see the Mi Logo. Or just goto Updater app > 3 dots on the upper right corner > Reboot to Recovery mode > Reboot now, as shown below:-


CREATING THE BACKUP:

Check that you have sufficient storage on your phone for the backup, as shown below:-


From the TWRP main menu, tap Backup.
In the backup menu, tick Boot, Nvram, System and Data and encrypt if you want.
Swipe to the right, to start the backup process, which might take a minute or two depending on the size of your backup, once the Backup is Successful, just click Reboot System to go to system, as shown below:-


STORING THE BACKUP:

Now that you have made a Nandroid Backup for yourself,you need to store it separately from your device to a computer or OTG flash drive for your convenience and to recover the much needed space on your phone. 


Use your Explorer app, goto Internal storage > TWRP > Backup, touch & hold and choose cut, and move to your OTG flash drive and choose paste, or if you decide to save it in your computer just cut the Backup file into a pre-created folder TWRP on your computer, as in the following imagery:-


Only when you need it due to the untoward circumstance,then transfer it back to your phone from your computer or OTG flash drive.

REVIVING & RESTORING YOUR DEVICE:

Should you run into a bricked, a bootloop or you lose your Nvram information, all you need to do is to restore from the backup you have made earlier. 
Now, copy the Backup from where you saved it, be it in your computer or OTG flash drive and just copy the Backup file to your device’s TWRP folder.
Then Reboot to Recovery from your device, and choose Backup from the TWRP main menu, and tap Restore, choose the Backup file, as shown below:-


Having done the restoration, go back to the TWRP main menu, tap Reboot System.

Now you should be back to where you are before the bootloop or bricked.

Should you want to use TWRP 2.8.7.0 use the link below:


CREDIT TO:

DISCLAIMER: Always perform a NANDROID Backup before you endeavor into flashing or updating your ROM. Flashing can potentially cause a brick or a bootloop. DO IT ON YOUR OWN RISK.


“Solving with Simplicity”

Tuesday, February 9, 2016

REDMI NOTE 3 / PRO: Backup, Encrypt and Restore


Greetings...


This is a tutorial on how to backup, encrypt and restore your precious personal data and application to a different location and restoring it when you need it most. We are going work with ADB Terminal Command to be able to complete this task. It pretty easy to grasp and comprehend once it get the feel of it, probably you might even want to explore more of the usage of the command for your Android devices.

Environment:

Microsoft® Windows® 8/7/Vista (32- or 64-bit) and Windows® 10. For upgrade from a previous build of Windows, to Windows® 10, a fresh installation of Android SDK Tools is required.

Requirements:

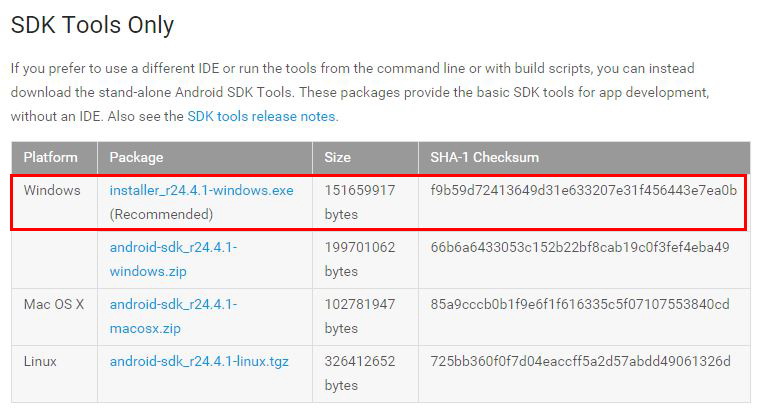
Download and install: Android SDK Tools


Download and install: Java SE Development Kit 32-bit
Download and install: Java SE Development Kit 64-bit (running 64-bit Windows)


Essentials:
USB DATA cable (the one that came with your device)
USB Port on your PC/Laptop
Enable USB Debugging - Goto Settings > Additional settings > Developer options > USB Debugging - Enable (If you have not activated Developer options, then Goto Settings > About phone > tap MIUI version 7 times > You are now a developer)

Installing the Android SDK Tools:
Goto Start Menu, Right-click SDK Manager and Run as administrator, as shown below:-


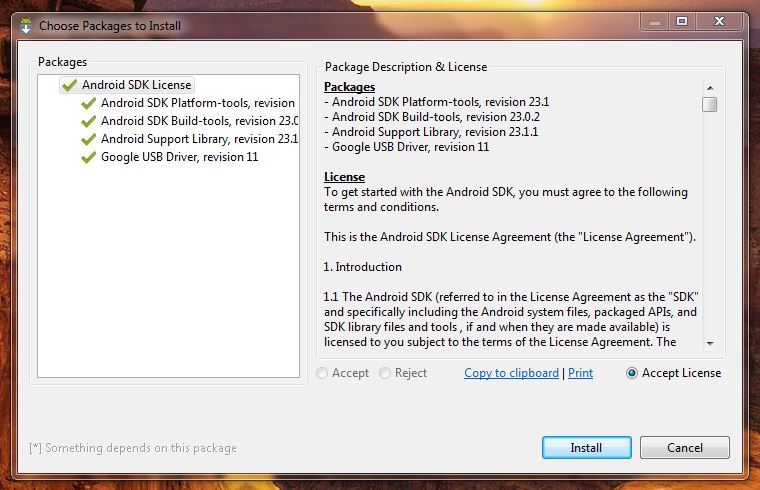
In the SDK Manager Terminal, check the box as shown in the images below:-


Accept License and click Install, to update what you have just ticked, as shown below:-


Backup your Redmi Note 3/Pro:
Note: Replace all the applicable "COMPUTER_NAME" to the actual name of your computer.
Now connect your device to the computer via USB cable. After you done that, we need to locate the ADB.EXE, by copying the code below which is the path, onto your window explorer and press enter, in the following image:-
C:\Users\COMPUTER_NAME\AppData\Local\Android\android-sdk\platform-tools

Once you are at platform-tools folder, hold Shift on your keyboard and right-click your mouse inside it, and select Open command window here, as shown below:-


Now key the ADB command in the Terminal Window, as follows:-
To check the ADB version:-
adb version
To check whether your device is detected:-
adb devices
To start doing your backup, you can use adb backup command to backup your device.The command below is assuming you are going to backup everything, which is all your installed apps (APK files) and shared storage (SD card) data to the C:\Users\COMPUTER_NAME\backup.ab file on your computer.
adb backup -apk -shared -all -f C:\Users\COMPUTER_NAME\backup.ab
All the command entered as shown below:-


After running this command, you will have to agree to the backup on your device. Should you want to encrpyt, enter a password to encrypt the backup, as shown below:-


After done that, the process might take some time depending on the size of your backup.

To see where your backup is, just use this path C:\Users\COMPUTER_NAME, as shown below:-


Restore your Redmi Note 3/Pro:
To restore your backup, at anytime you need enter the following command:-
adb restore C:\Users\COMPUTER_NAME\backup.ab
As shown below:-


You will then be asked to do a full restore, this will replace the data and apps on the device with the ones from your backup. If you encrypted the backup with a password, you will need to enter the password to restore it, as shown below:-


Now you should be where you were before. It is always advisable to frequently backup, which will give a restoration point to return to, after some crashes or a bricked.


DRIVER SOURCE:

DISCLAIMER: Always perform a NANDROID Backup before you endeavor into flashing or updating your ROM. Flashing can potentially cause a brick or a bootloop. DO IT ON YOUR OWN RISK.

“Solving with Simplicity"

Saturday, January 30, 2016

NANDROID BACKUP for Redmi Note 3 [ROOTED]


Android phone has always been a geek’s joy, very convenient to customize with custom recoveries, custom ROMs and launchers. All seem too easy and fun, yet there are, times you might panic when you get a boot loop or a soft-brick while flashing or doing a simple update. There are many reasons behind it, eg. Checksum does not match, corrupted file or ROM, interruption of transmission between your device and the computer and etc. That’s where Nandroid comes into play, to restore your backup file as it was before, in working order.

NANDROID BACKUP FEATURES:
Nandroid backup is the process of backing up your Redmi Note 3 like :-
  • Boot
  • Nvram – Stores WiFi, Bluetooth MAC address, Baseband version, IMEI/MEID number and other information.
  • System
  • User Data – Messages, Call logs, media and app data.

IMPORTANCES OF NANDROID BACKUP:

  • Revived your bricked device
  • Recover the important information stored in the NVRAM
  • Recover your personal data

REQUIREMENTS:

  • ROOTED – At least a Native ROOT
  • TWRP - Custom Recovery

HELPFUL LINKS TO FLASH:
REBOOT TO RECOVERY MODE:

Go into Recovery mode, press & hold, the vol up + power button and release when see the Mi Logo. Or just goto Updater app > 3 dots on the upper right corner > Reboot to Recovery mode > Reboot now, as shown below:-


CREATING THE BACKUP:
Check that you have sufficient storage on your phone for the backup, as shown below:-


From the TWRP main menu, tap Backup.
In the backup menu, tick Boot, Nvram, System and Data.
Swipe to the right, to start the backup process, which might take a minute or two depending on the size of your backup, as shown below:-


Once the Backup is Successful, go back to the main menu and Reboot to System, as shown below:-


STORING THE BACKUP: 

Now that you have made a Nandroid Backup for yourself, you need to store it separately from your device to a computer or OTG flash drive for your convenience and to recover the much needed space on your phone.


Use your Explorer app, goto Internal storage > TWRP > Backup, touch & hold and choose cut, and move to your OTG flash drive and choose paste, or if you decide to save it in your computer just cut the Backup file into a pre-created folder TWRP on your computer, as in the following imagery:-


Only when you need it due to the untoward circumstance, then transfer it back to your phone from your computer or OTG flash drive.


REVIVING & RESTORING YOUR DEVICE:

Should you run into a bricked, a bootloop or you lose your Nvram informations, all you need to do is to restore from the backup you have made earlier.
Now, copy the Backup from where you saved it, be it in your computer or OTG flash drive and just copy the Backup file to your device’s TWRP folder.
Then Reboot to Recovery from your device, and choose Backup from the TWRP main menu, and tap Restore, choose the Backup file, as shown below:-


NOTE: Remember to untick "Only mount system read-only" when you are Restoring back from the Backup. The following images will determine whether it is SUCCESSFUL or FAILED:-

SUCCESSFUL

FAILED

Having done the restoration, go back to the TWRP main menu, tap Reboot and tap System, as shown below:-


Now you should be back to where you are before the bootloop or bricked.

CREDIT TO: TWRP 2.8.7.0 by Cloud

DISCLAIMER: Always perform a NANDROID Backup before you endeavor into flashing or updating your ROM. Flashing can potentially cause a brick or a bootloop. DO IT ON YOUR OWN RISK.

“Solving with Simplicity”

Monday, December 21, 2015

Sony Xperia M4 Aqua Dual : A love-hate experience

Box


Sony Xperia M4 Aqua is an attractive mid-range 5-inch HD display Android smartphone with the main striking features like being Waterproof certified with IP65/IP68 rating. A shooter with primary 13 megapixel camera and 5MP selfie front camera. It is powered by the Qualcomm Snapdragon 615 Octa-core 64-bit clock at 1.46Ghz. And it has a 2-day battery life and support Dual-sim card. Last but not least it actually comes with NFC which is proudly printed on the back cover. Shortfall was no LTE/4G (not available in all markets) for the Dual variance.
After reading many impressive reviews and going through the local Sony website on Xperia M4 Aqua, I went ahead and got one all for $220 which is almost half the price of the flagship Xperia Z3. What a good buy, right? Wait a minute!
xperia-m4-aqua-dual-white-1240x840-0c4c09bcacafc11535b2dff46706facc (1)
With much excitement and enthusiasm, I unboxed it quickly, admiring the built of the phone. And I went on to plug-in my sim-card, I realized it wasn’t the mini-sim as shown on the images on the product website. Anyway, that’s not to worry about, after all being an avid iPhone user, I always get the nano-sim, so I just have to inset it without the adaptor.
Screenshot_2015-10-09-15-38-26-tile
Next, setup the phone for initial usage. The screen resolution looks sharp and crisp. Went on to update the Google Play Store and install the popular social networking apps like Whatsapp, Viber, Line App and a few more. And that’s when it started giving all memory warnings. Hell no! I have used 85% of the device memory. What?! I have not even update the preloaded apps on the phone and I already getting these warnings. Alright, no doubt it comes with 8GB of storage (16GB is no currently available), but I just could not comprehend the scenario. Well, first thing first, deleting the preloaded apps. The result, I managed to delete a few Launcher rather than an app which is a few tenths of megabyte, that I gained. What choice do I have other than to plug-in a memory card. Knowingly well enough calling an app will be much delayed from the SD memory allocation. Now, I have to jiggle with app size to download as I have very limited space to deal with. It is kind of silly due to the limitation of memory usage, literally speaking, you have approximately 2.89GB of memory available, for your apps, photos and other media. The Official Sony Product website is very misleading to small print which I extracted from http://www.sonymobile.com
“*****The M4 Aqua Dual has 3 GB of free memory (before you update preloaded applications) available to the user for downloaded applications and their data, music, pictures and movies while the device has up to 8 GB of flash memory in total.” which I found is not correct, as I reset the M4 Aqua to see the real truth to Sony’s claim. Reading between the line, I am pretty sure Sony is well aware, should the “Preloaded Apps” were updated, the device storage will shrink with little or no space for other user apps to be installed, other than to move most the apps to the SD card.
DSC_0091 DSC_0088 DSC_0041  DSC_0046 DSC_0045DSC_0133
All images have not been edited or Photoshop and “as it is”. (Click to see full size)
Verdict:
  • Nice build
  • Camera is good for a mid-range phone
  • Audio is quite good and loud
  • HD screen is sharp and crisp
  • Waterproof, but the headphone jack did went haywire when submerged in the pipe water
  • Battery life not consistent
  • Network signal not really reliable
  • 8GB is definitely not enough and not a selling point
  • Overall performance is sluggish

Thoughts:
I am a bit skeptical about the Snapdragon 615 especially the over-heating glitch and etc, while a few devices manage to work around the problems. The Xperia M4 Aqua does feel hot at times and having a just 8GB simply is not helping since the Android 5.0 (Lollipop) Operating System file is occupying more than 4.00GB of space plus the preloaded Sony related apps which does not give an option to delete is really squeezing the good user experience to the max. Xperia M4 is in line to receive this crucial Android 6.0 Marshmallow OS update with the memory management but will it help?
With all the bloatware (pre-installed apps) on Android’s openness by cellular carriers and phone manufacturers often make the experience worse for it users, and that thin line separate iOS devices user and making iOS platform a premium and maximum user experience, without bloatware.
© 2015 Felix Senada. All rights reserved.